NUALA WITH THE HULA IN A STORM
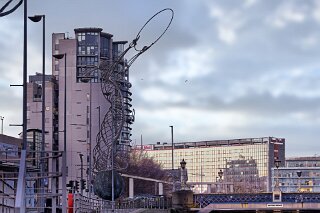
THE BEACON OF HOPE OR NUALA WITH THE HULA [BELFAST DURING STORM BRAM]
As soon as I arrived in Belfast, I captured one of the city's most famous modern landmarks: the "Beacon of Hope" (locally and affectionately known as "Nuala with the Hula"), situated right by Queen's Bridge.
This was my first time using the new Sony FE 100mm Macro lens. However, due to the driving rain and wind, I had to give up after about 45 minutes; it became impossible to keep the lens glass dry. Despite these challenges, the photographs were usable, though the colour of the captured images tended towards a flat battleship grey.
As I was having difficulty processing the photographs, I sought some assistance and received the following advice:
Why the "Grey" Happens
A "battleship grey" or flat colour cast is entirely expected when shooting in conditions like Storm Bram. Here is why your images look that way:
Diffused Light: During a storm, thick cloud cover acts like a massive, neutral-density softbox. It eliminates the shadows and highlights that usually provide an image with "pop" and colour contrast.
Low Colour Temperature: Overcast and stormy skies often have a higher colour temperature (cooler/bluer). This can make colours look muted and desaturated compared to the "golden hour" or direct sunlight.
Atmospheric Haze: Rain and high humidity create airborne clutter. This moisture scatters light, reducing the black levels in your image—a phenomenon called "veiling glare"—which pulls everything toward the middle of the histogram: the grey zone.
The Lens Factor: The Lens Factor: While the Sony FE 100mm F2.8 Macro GM OSS is an incredible piece of glass—boasting 1.4x magnification and extreme G Master sharpness—it is designed for high micro-contrast. In the flat, low-contrast light of a storm, the lens faithfully records that lack of depth, resulting in the "battleship grey" look before post-processing.
How to "Fix" it in Post-Processing
Since the images are usable, you can bring them to life with a few specific tweaks:
Dehaze Tool: This is your best friend for stormy shots. It helps cut through atmospheric moisture and restores "black" to the shadows.
White Balance: Warm the image up slightly to counteract the cold blue/grey tones of the storm.
Vibrance vs. Saturation: Increase the Vibrance rather than the Saturation. This will boost the muted colours (such as the copper and steel tones of the statue) without making the grey sky look artificial.
As soon as I arrived in Belfast, I captured one of the city's most famous modern landmarks: the "Beacon of Hope" (locally and affectionately known as "Nuala with the Hula"), situated right by Queen's Bridge.
This was my first time using the new Sony FE 100mm Macro lens. However, due to the driving rain and wind, I had to give up after about 45 minutes; it became impossible to keep the lens glass dry. Despite these challenges, the photographs were usable, though the colour of the captured images tended towards a flat battleship grey.
As I was having difficulty processing the photographs, I sought some assistance and received the following advice:
Why the "Grey" Happens
A "battleship grey" or flat colour cast is entirely expected when shooting in conditions like Storm Bram. Here is why your images look that way:
Diffused Light: During a storm, thick cloud cover acts like a massive, neutral-density softbox. It eliminates the shadows and highlights that usually provide an image with "pop" and colour contrast.
Low Colour Temperature: Overcast and stormy skies often have a higher colour temperature (cooler/bluer). This can make colours look muted and desaturated compared to the "golden hour" or direct sunlight.
Atmospheric Haze: Rain and high humidity create airborne clutter. This moisture scatters light, reducing the black levels in your image—a phenomenon called "veiling glare"—which pulls everything toward the middle of the histogram: the grey zone.
The Lens Factor: The Lens Factor: While the Sony FE 100mm F2.8 Macro GM OSS is an incredible piece of glass—boasting 1.4x magnification and extreme G Master sharpness—it is designed for high micro-contrast. In the flat, low-contrast light of a storm, the lens faithfully records that lack of depth, resulting in the "battleship grey" look before post-processing.
How to "Fix" it in Post-Processing
Since the images are usable, you can bring them to life with a few specific tweaks:
Dehaze Tool: This is your best friend for stormy shots. It helps cut through atmospheric moisture and restores "black" to the shadows.
White Balance: Warm the image up slightly to counteract the cold blue/grey tones of the storm.
Vibrance vs. Saturation: Increase the Vibrance rather than the Saturation. This will boost the muted colours (such as the copper and steel tones of the statue) without making the grey sky look artificial.
THE BEACON OF HOPE